Friday, May 30, 2014

End of the Year "Sail"ebration

Today we had our end-of-the-year class party.  I know these are supposed to be fun affairs, but these sorts of things stress me out because I never know what to do!  My school has huge parent involvement (it's actually required, but my parents this year are the type that would show up to everything even if it wasn't) so inviting families to attend our class parties is really just a given part of our school culture.  Don't get me wrong, having moms, dads, sisters, brothers and grandparents show up for our small class celebrations gives me warm fuzzies and makes me smile on the inside to know my students are so cared for.  However, it also makes me loose sleep, I mean, these families are taking the time out of their work day, to drive all the way out to school, to eat snacks and play games with us.  I want to make sure they feel welcome!

Each classroom at our school has their own theme.   Our theme is 'Navigators' (hence the name of the blog).  I decided to go with the theme of the classroom for our final celebration, which I nick-named a "sail"ebration.  Since it was the last one I decided to actually decorate.  Normally I don't, because in my head who really cares what the classroom looks like as long as we get ample amounts of chocolate?!   However, when my students came in after specials and saw the table all set up they were so excited that I may have to rethink that logic.  Here is a picture of the finished tablescape.  Please don't judge the messy shelf behind it. That's my pile of paperwork that needs to be sorted and filed once students are gone and I have a second to just sit and organize myself.


 Much of this stuff I had on hand.  The table cloth is one I pull out for every celebration.  We only have a few class parties--once for winter break (aka Christmas) another in January to celebrate Chinese New Year, February for Valentines day and May for the end of the year.  Red goes for every holiday so buying a nicer vinyl tablecloth was totally worth it as I can reuse it over and over, versus having to buy a new one each time.

The sailboat/chip holder I found at Jo-Ann Fabrics.  It was on clearance and is actually a flower pot.  I just bought a dowel that fit inside it and made my own sail.  I actually made a bunch of different sails, one for each celebration.  My students were pretty excited about it.

Another thing I did was I had my students wrap up all the spoons inside my napkins, and tie them with life savers to look like life preservers.  I got the idea here.  

Continuing with the theme, we each made origami boats and set them out next to a few cups filled with candy.  Students used the boats as candy dishes and scooped all the candy they wanted into their boat.  They thought that was cool.  However, doing even simple origami on the last day of school was a little hectic.  Next year I may have them make the boats earlier in the week when they aren't quite as distracted...

To finish off the decorations, I had my students make tissue paper poms and we hung them up along with streamers.  Here is the finished result:


     The food was donated by parents.  I assigned what they should bring in.  It worked pretty well, we had a nice variety of things, although we had a lot of left overs.  I'm still trying to figure out the best way to organize food for classroom parties.  If you have any suggestions, I'd love to hear them! 

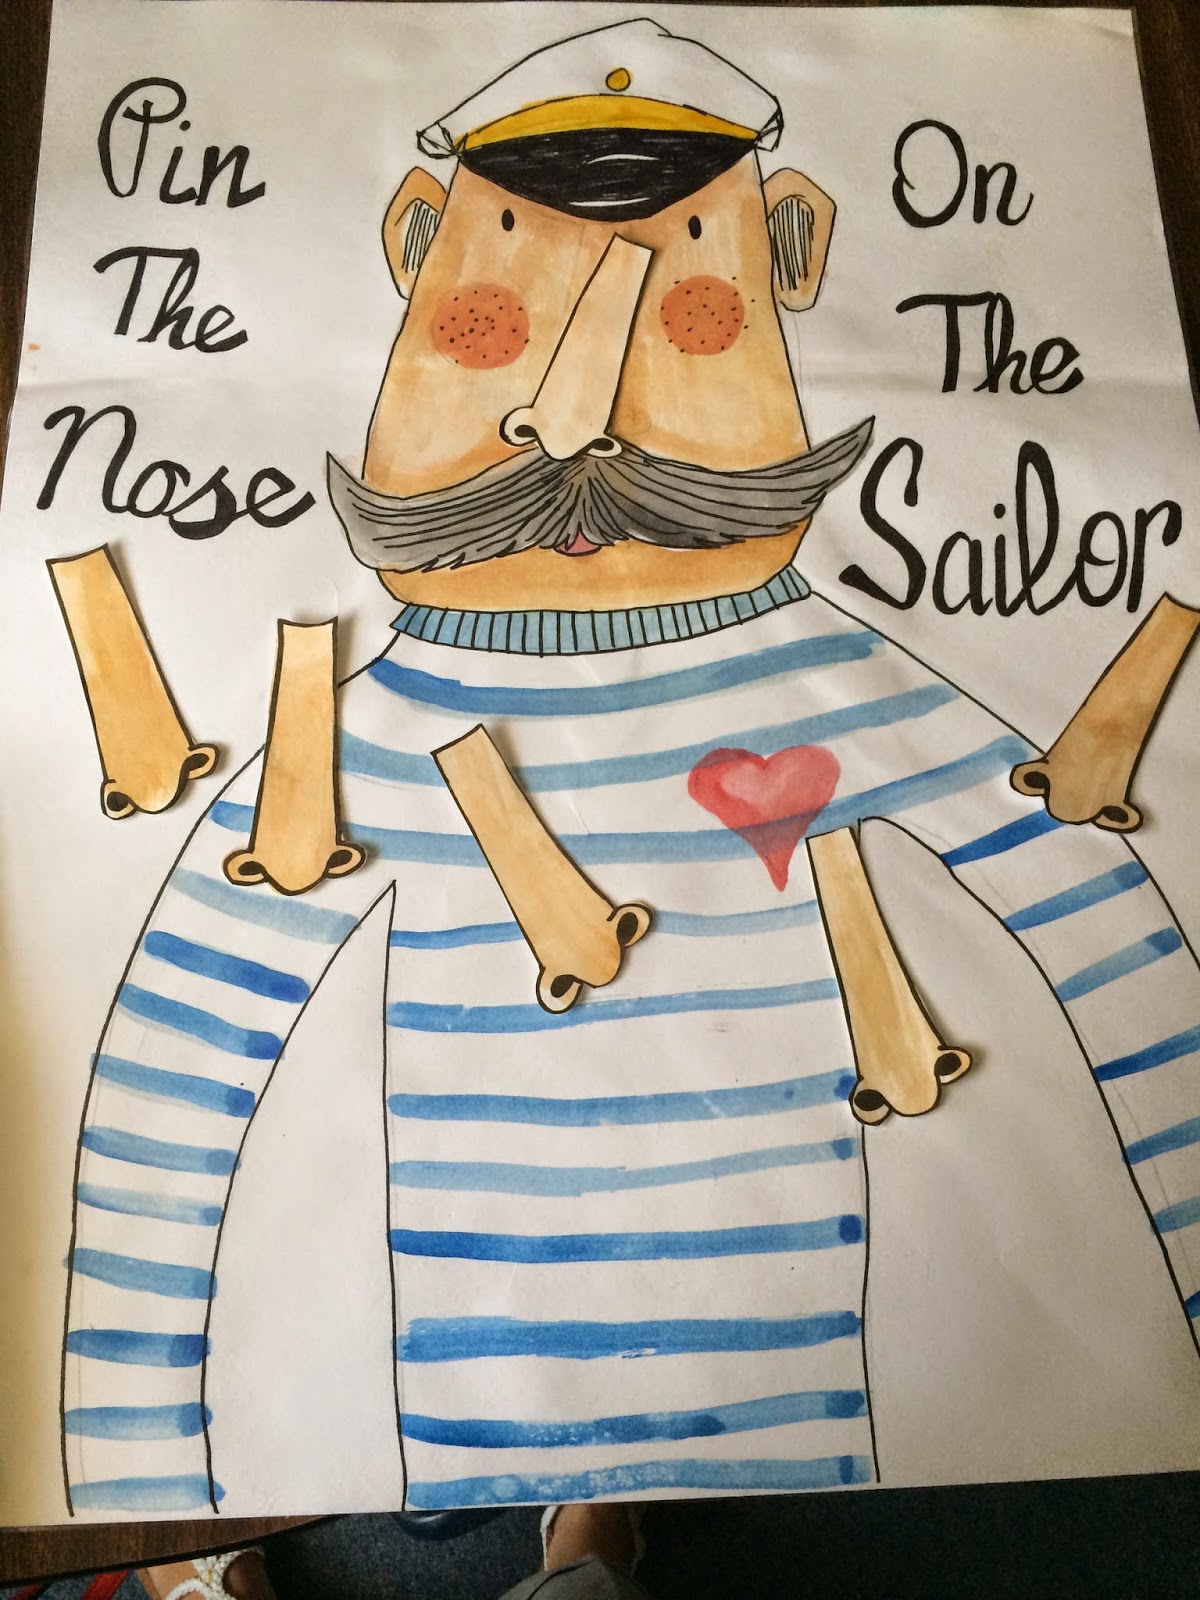
      For activities at the party, my students wanted to play pin the tail on the donkey.  To go with our theme I switched it to 'Pin the Nose of the Sailor'.  I found a picture of a sailor I liked online and drew it out and painted it with water colors. I also painted 16 noses.  I laminated them so that I could use them again next year.  This also allowed students to write their names on the nose with dry erase markers while they played.    They loved it!    Hopefully next year I'll think of more, but for this year, this was the only nautical themed game I had.  Other than that I just let them play any of our classroom games.  They had a great time!  The laid-back schedule also gave me time to talk to the parents/families and thank them personally for their overwhelming support this year.  I was one lucky teacher to have such great students and families!

Thursday, May 29, 2014

Wetland Projects

These wetland projects are great for the end of the year because they are motivating enough to keep even the most reluctant workers engaged up until the last day!  

In third grade, plants and animals are both big units in science, so at the end of the year we learn how the two kingdoms interact by creating a wetland model out of a 2 Liter soda pop bottle.  I had parents collect the pop bottles and send them in.  However, another teacher called Pepsi and was able to get some donated for her class.  I will have to try this next year...if only I can stay ahead of the game enough, as you have to request them a fair amount in advance and be able to pick them up yourself.  (The nearest Pepsi plant is about an hour away from us.)

But on with how it's made.  Simply cut the soda bottle about 3/4 of the way up.  Line the two cut edges with masking tape to prevent kids from cutting themselves.   Use a rubber band to tie a small piece of pantyhose around the nose of the bottle.  Then, turn the top upside down and rest it in the bottom.   

For the bottom part, I put in rocks that you buy in the pet department that would normally go in a fish tank.  We used both fractions and division to figure out how many cups of rocks each student could get and there still be enough for everyone.   Then we filled it up with water.  For the top, about 2 cups of soil fit. Then came the grass.  Make sure to buy the quick growing kind:

At first I was pretty frugal with the grass seed, wanting to make sure there was enough.   However, when the grass grew it looked pretty sparse, so I ended up going back and adding more.   Use about 1 to 1/5 tablespoons per project.  We found out the hard way that grass seed doesn't keep from year to year, so you might as well use it all up anyways!  As the roots grow students will be able to watch as the water level decreases as they suck it up to nourish the growing grass!   

To incorporate the animal kingdom, a friend collected tadpoles from her pond.  We researched online about what tadpoles needed, and discovered that any amount of chlorine could harm them, so we should let our water sit for about 5 days to let the chlorine evaporate.  I don't know how valid that is, but we did it anyways.  When we put them in, the tadpoles were super tiny, only a few millimeters in length.  The students had to use magnifying glasses to see them!

Another teacher also introduced night crawlers into the soil at the top.  She got them from Walmart.  I think this is a fabulous idea--I just didn't get around to getting them, and we were so busy with other end of the year things that I'm not sure we could have done much discussion about them.  Next year I definitely want to start this project earlier in the year.  I gave only two weeks, when three would have been much better.

As you can see from the picture above the grass grew incredibly fast!  So did the tadpoles (the one in the picture above is hiding in the rocks...)  I made the students promise that as soon as the legs started to grow they had to release their frog into a pond.   Because my students are who they are this year, they completely agreed and that was enough!   If you aren't up for tadpoles though, fish are another great option!  I just wanted something the students could release back into the wild should their parents not be too keen on a new pet.   I aslo gave parents a heads up about the project and if any of them had an objection I released the tadpoles for them before sending the project home!


Wednesday, May 28, 2014

Paper Mache Madness

Today we almost finished our paper mache piggy banks.


We started these as a fun, end-of-the-year project to wrap up our economics unit.  We wanted something that would help them remember not only one of the bigger units in third grade, but also what they were like as third graders, so rather than decorating them like a pig, we decided to decorate them like their own faces.

We learned A LOT about paper mache!
Here are a few of the highlights:
1.  For the flour and water mixture, it does not need to be very thick.  Too thick and it won't dry.  Think of a latte rather than a milkshake.
2.  When setting them outside to dry, be careful not to set them outside too long in the hot sun--the heat will make the molecules in the balloons expand and the balloons will pop.  I had my kids leave theirs inside over night, and they were mostly dry the next day.   Not completely, but enough to start the next layer.   If you set them outside, 20 minutes should be plenty, depending on the weather.
3.  It is VERY messy.  Students should wear an old shirt or apron.   Put lots of drop cloths on the floor.  buy extra baby wipes to wipe up afterwards.
4.  Your final layer (which was our 3rd layer) should be white copy paper.  This makes it easier to paint afterwards.
5.  While letting them dry outside, we set them in cardboard crates that the milk gets shipped to us in.  There were plenty in the cafeteria, and two balloons fit in each crate.  The sides of the crate helped the balloons not to fly away, as once they are dry they are pretty light.  We labeled the crate with the students names.

Once they were dry, I spray painted them all a basic skin tone.  It took two cans of paint and about 20 minutes.  I set them out in their crates to dry and 10 minutes later... ta-da!  One can was almond colored (a little lighter) and one was a camouflage tan. I also already had a dark brown can of spray paint on hand, so it worked out great!

Next, we got out the mirrors and inspected our ears.   We discussed the proportion of our facial features.  If you split your face into thirds, your ears take up the middle third-they are the same height as your nose!  My students were surprised by this.  Funny how we miss such details on something we look at every day!  They drew their ears out and while they were at specials, I used an exacto knife to cut them out.  I folded them forward and this made the balloon look a lot more like a human face, rather than an alien!  This also provides a way for students to slip their money out when they want it.   While I had the exacto knife out, I cut a slot in the back for them to put their money in.
  These ears are cut out but not yet folded forward.  See how it looks like an alien!?         

        
A little close together, but it gives you the idea of how I cut and folded them.

Next we drew out the faces.   Again.  The nose should be the same height, and in line with, your ears.  Also, the width of your eye, is the same size as the space in between your eyes.  This helped students be able to draw their faces pretty proportionately.  Students really struggled on the nose, so we practiced a few different ways to draw noses.   One of the other third grade teachers, hearing about how my class had a hard time, decided to mold her noses out of modeling clay, then glued it onto their paper mache after the first layer.  After that, they just put the rest of the paper mache over the nose.  I will definitely be trying this out next year!
Here are some samples of student faces after they painted them!  It really didn't take much paint at all since I had already spray painted the base coat.  The painting took them about 30 minutes.


Finally we added hair.   Hair definitely made it look less alien like.  Also the trick was the bring the hair further down on the forehead.  
 
   This is the same head, just with about an inch more of hair in front on the second one.  It made it look a lot lot better!
    I had pre cut a lot of strands of yarn ahead of time by rolling the yarn around the back of a chair and just cutting up each side.  I had to cut more as the students worked but I was able to keep up pretty easily.  Students also helped to cut.  We used about 3/4 of a ball of yellow yarn and 3/4 the ball of brown yarn and about 1/2 of the black.  They layered the hair on string by string.   Some just threw it on top, but the end result wasn't quite as nice.


While we were putting on the hair, one of my boys thought his head was beginning to look like Miley Cyrus, and couldn't figure out how to fix it.  I gave him back a mirror and he figured out he just needed to add some bangs.  By the end he was on his way to looking more like him!
  

One last thing!  The necks are made out of a pool noodle.   I was able to get 17 necks out of just one noodle.  Make sure to get the extra wide ones.  We cut the noodle in a parallelogram shape.  Slanted on the top so that the back is taller, this allows the head to rest nicely on it.   On the bottom, in order to balance out the weight of the head, I cut it so that the front was a little bit longer than the back.  This allowed the head to stand up on its own!  I hot glued it to the balloon head and then used a tan colored duct-tape to tape them on more securely.  This also colored over the orange noodle.   Tomorrow we will add a strip of a different colored duct tape along the bottom to become a shirt collar.  Then we'll be done!